
| 일 | 월 | 화 | 수 | 목 | 금 | 토 |
|---|---|---|---|---|---|---|
| 1 | 2 | 3 | 4 | 5 | 6 | |
| 7 | 8 | 9 | 10 | 11 | 12 | 13 |
| 14 | 15 | 16 | 17 | 18 | 19 | 20 |
| 21 | 22 | 23 | 24 | 25 | 26 | 27 |
| 28 | 29 | 30 | 31 |
- 예제로 배우는 스프링 입문
- 자바
- JavaScript
- Kotlin
- 스프링
- java
- Spring
- Effective Java 3
- 이펙티브 자바
- 자바스크립트
- Effective Java
- k8s
- 스프링부트
- 티스토리챌린지
- Sort
- kubernetes
- effectivejava
- 카카오 면접
- 클린아키텍처
- 오블완
- 이차전지관련주
- 알고리즘정렬
- 카카오
- 알고리즘
- 이펙티브자바
- 김영한
- 스프링핵심원리
- ElasticSearch
- 엘라스틱서치
- 스프링 핵심원리
- Today
- Total
Kim-Baek 개발자 이야기
Spring Boot + MongoDB Audit 완벽 설정 가이드 | @EnableMongoAuditing 실전 적용기 본문
Spring Boot + MongoDB Audit 완벽 설정 가이드 | @EnableMongoAuditing 실전 적용기
김백개발자 2024. 12. 10. 13:46이 글을 읽으면: Spring Data MongoDB의 Audit 기능으로 '누가, 언제' 데이터를 생성/수정했는지 자동으로 추적하는 방법을 배울 수 있습니다. 실무에서 바로 적용 가능한 코드와 함께 자주 발생하는 문제 해결법까지 다룹니다.
📌 목차
1. 왜 Audit이 필요한가? - 실무 사례
😫 실무에서 겪은 문제
프로젝트를 운영하다 보면 이런 상황이 자주 발생합니다:
상황 1: 데이터 변경 이력 추적 불가
PM: "이 사용자 정보, 누가 언제 수정했어요?"
개발자: "...로그를 뒤져봐야 알 것 같습니다"
PM: "😡"
상황 2: 버그 원인 파악 어려움
- 어제까지 정상이었던 데이터가 오늘 이상함
- 누가 수정했는지, 언제 수정됐는지 알 수 없음
- 원인 파악에 2시간 소요...
상황 3: 감사(Audit) 요구사항
보안팀: "금융 데이터는 모든 변경 이력을 추적해야 합니다"
개발자: "각 테이블마다 수동으로 로그를 남겨야 하나요?"
✨ Audit 기능의 해결책
Spring Data MongoDB의 @EnableMongoAuditing을 사용하면:
- ✅ 자동으로 생성일시, 수정일시 기록
- ✅ 자동으로 생성자, 수정자 기록
- ✅ 모든 Entity에 일관되게 적용 가능
- ✅ 별도 로직 작성 불필요
2. MongoDB Audit 기본 개념
2.1 주요 어노테이션
Spring Data MongoDB는 4가지 Audit 어노테이션을 제공합니다:
어노테이션 의미 데이터 타입 기록 시점
| @CreatedDate | 생성일시 | LocalDateTime, Instant 등 | 최초 저장 시 |
| @LastModifiedDate | 수정일시 | LocalDateTime, Instant 등 | 저장/수정 시 |
| @CreatedBy | 생성자 | String, Long 등 | 최초 저장 시 |
| @LastModifiedBy | 수정자 | String, Long 등 | 저장/수정 시 |
2.2 동작 원리
Entity 저장 요청
    ↓
Spring Data MongoDB가 감지
    ↓
@CreatedDate/@CreatedBy 필드에 값 자동 설정 (최초 1회)
@LastModifiedDate/@LastModifiedBy 필드에 값 자동 설정 (매번)
    ↓
MongoDB에 저장
3. 실전 코드 구현 - 단계별 가이드
Step 1: 의존성 추가
// build.gradle.kts
dependencies {
    implementation("org.springframework.boot:spring-boot-starter-data-mongodb")
    implementation("org.springframework.boot:spring-boot-starter-security") // Optional: 사용자 추적 시
}
Step 2: @EnableMongoAuditing 설정
package com.example.config

import org.springframework.context.annotation.Bean
import org.springframework.context.annotation.Configuration
import org.springframework.data.domain.AuditorAware
import org.springframework.data.mongodb.config.EnableMongoAuditing
import org.springframework.security.core.context.SecurityContextHolder
import java.util.Optional

@Configuration
@EnableMongoAuditing
class MongoAuditConfig {

    /**
     * 현재 사용자 정보를 제공하는 AuditorAware 구현
     * @CreatedBy, @LastModifiedBy에서 사용됨
     */
    @Bean
    fun auditorProvider(): AuditorAware<String> {
        return AuditorAware {
            // Spring Security 사용 시
            val authentication = SecurityContextHolder.getContext().authentication

            if (authentication != null && authentication.isAuthenticated) {
                Optional.of(authentication.name)
            } else {
                // 인증 정보가 없을 때 기본값
                Optional.of("system")
            }
        }
    }
}
Step 3: BaseEntity 추상 클래스 생성 (권장)
package com.example.domain

import org.springframework.data.annotation.CreatedBy
import org.springframework.data.annotation.CreatedDate
import org.springframework.data.annotation.LastModifiedBy
import org.springframework.data.annotation.LastModifiedDate
import java.time.LocalDateTime

/**
 * 모든 Entity의 공통 Audit 필드를 담은 추상 클래스
 * 이 클래스를 상속받으면 자동으로 Audit 필드가 추가됨
 */
abstract class BaseEntity(

    @CreatedDate
    var createdAt: LocalDateTime? = null,

    @LastModifiedDate
    var updatedAt: LocalDateTime? = null,

    @CreatedBy
    var createdBy: String? = null,

    @LastModifiedBy
    var updatedBy: String? = null
)
💡 왜 추상 클래스로 만드나요?
- 모든 Entity에서 반복되는 Audit 필드를 한 곳에서 관리
- DRY(Don't Repeat Yourself) 원칙 준수
- 나중에 Audit 필드 변경 시 한 곳만 수정하면 됨
Step 4: Entity에 적용하기
방법 1: BaseEntity 상속 (추천)
package com.example.domain

import org.springframework.data.annotation.Id
import org.springframework.data.mongodb.core.mapping.Document

@Document(collection = "users")
data class User(
    @Id
    val id: String? = null,

    val name: String,
    val email: String,
    val age: Int,
    val isActive: Boolean = true

) : BaseEntity()  // BaseEntity를 상속받아 Audit 필드 자동 추가
방법 2: 직접 선언 (BaseEntity 없이)
package com.example.domain

import org.springframework.data.annotation.CreatedBy
import org.springframework.data.annotation.CreatedDate
import org.springframework.data.annotation.Id
import org.springframework.data.annotation.LastModifiedBy
import org.springframework.data.annotation.LastModifiedDate
import org.springframework.data.mongodb.core.mapping.Document
import java.time.LocalDateTime

@Document(collection = "products")
data class Product(
    @Id
    val id: String? = null,

    val name: String,
    val price: Int,
    val stock: Int,

    // Audit 필드
    @CreatedDate
    var createdAt: LocalDateTime? = null,

    @LastModifiedDate
    var updatedAt: LocalDateTime? = null,

    @CreatedBy
    var createdBy: String? = null,

    @LastModifiedBy
    var updatedBy: String? = null
)
📸 이미지 2: Entity 클래스 비교 다이어그램

Step 5: Repository 인터페이스
package com.example.repository

import com.example.domain.User
import org.springframework.data.mongodb.repository.MongoRepository

interface UserRepository : MongoRepository<User, String> {
    // 기본 CRUD 메서드만으로 Audit 기능 동작
    // save(), findById(), findAll() 등
}
Step 6: Service 계층에서 사용
package com.example.service

import com.example.domain.User
import com.example.repository.UserRepository
import org.springframework.stereotype.Service
import org.springframework.transaction.annotation.Transactional

@Service
class UserService(
    private val userRepository: UserRepository
) {

    /**
     * 사용자 생성
     * createdAt, createdBy가 자동으로 설정됨
     */
    @Transactional
    fun createUser(name: String, email: String, age: Int): User {
        val user = User(
            name = name,
            email = email,
            age = age
        )

        return userRepository.save(user)
        // 저장 시 자동으로:
        // - createdAt = 현재 시각
        // - createdBy = "admin" (현재 로그인 사용자)
        // - updatedAt = 현재 시각
        // - updatedBy = "admin"
    }

    /**
     * 사용자 수정
     * updatedAt, updatedBy가 자동으로 갱신됨
     */
    @Transactional
    fun updateUser(id: String, name: String): User {
        val user = userRepository.findById(id)
            .orElseThrow { IllegalArgumentException("User not found") }

        val updated = user.copy(name = name)

        return userRepository.save(updated)
        // 저장 시 자동으로:
        // - updatedAt = 현재 시각 (갱신)
        // - updatedBy = "admin" (갱신)
        // - createdAt, createdBy는 유지
    }
}
Step 7: 테스트 코드로 검증
package com.example.service

import com.example.domain.User
import com.example.repository.UserRepository
import org.junit.jupiter.api.Test
import org.springframework.beans.factory.annotation.Autowired
import org.springframework.boot.test.context.SpringBootTest
import org.springframework.security.test.context.support.WithMockUser
import org.springframework.transaction.annotation.Transactional
import kotlin.test.assertEquals
import kotlin.test.assertNotNull
import kotlin.test.assertTrue

@SpringBootTest
@Transactional
class UserServiceTest {

    @Autowired
    private lateinit var userService: UserService

    @Autowired
    private lateinit var userRepository: UserRepository

    @Test
    @WithMockUser(username = "testuser")
    fun `사용자 생성 시 Audit 정보가 자동으로 기록되는지 테스트`() {
        // given
        val name = "김철수"
        val email = "test@example.com"
        val age = 30

        // when
        val savedUser = userService.createUser(name, email, age)

        // then
        assertNotNull(savedUser.id)
        assertNotNull(savedUser.createdAt)
        assertNotNull(savedUser.createdBy)
        assertNotNull(savedUser.updatedAt)
        assertNotNull(savedUser.updatedBy)

        assertEquals("testuser", savedUser.createdBy)
        assertEquals("testuser", savedUser.updatedBy)

        println("✅ 생성일시: ${savedUser.createdAt}")
        println("✅ 생성자: ${savedUser.createdBy}")
    }

    @Test
    @WithMockUser(username = "admin")
    fun `사용자 수정 시 updatedAt과 updatedBy만 갱신되는지 테스트`() {
        // given
        val user = userRepository.save(
            User(name = "이영희", email = "lee@example.com", age = 25)
        )
        val originalCreatedAt = user.createdAt
        val originalCreatedBy = user.createdBy

        Thread.sleep(100) // 시간 차이를 두기 위해

        // when
        val updatedUser = userService.updateUser(user.id!!, "이영희2")

        // then
        assertEquals(originalCreatedAt, updatedUser.createdAt) // 생성일시 유지
        assertEquals(originalCreatedBy, updatedUser.createdBy) // 생성자 유지

        assertTrue(updatedUser.updatedAt!! > originalCreatedAt!!) // 수정일시 갱신
        assertEquals("admin", updatedUser.updatedBy) // 수정자 갱신

        println("✅ 생성일시 유지: ${updatedUser.createdAt}")
        println("✅ 수정일시 갱신: ${updatedUser.updatedAt}")
        println("✅ 수정자: ${updatedUser.updatedBy}")
    }
}
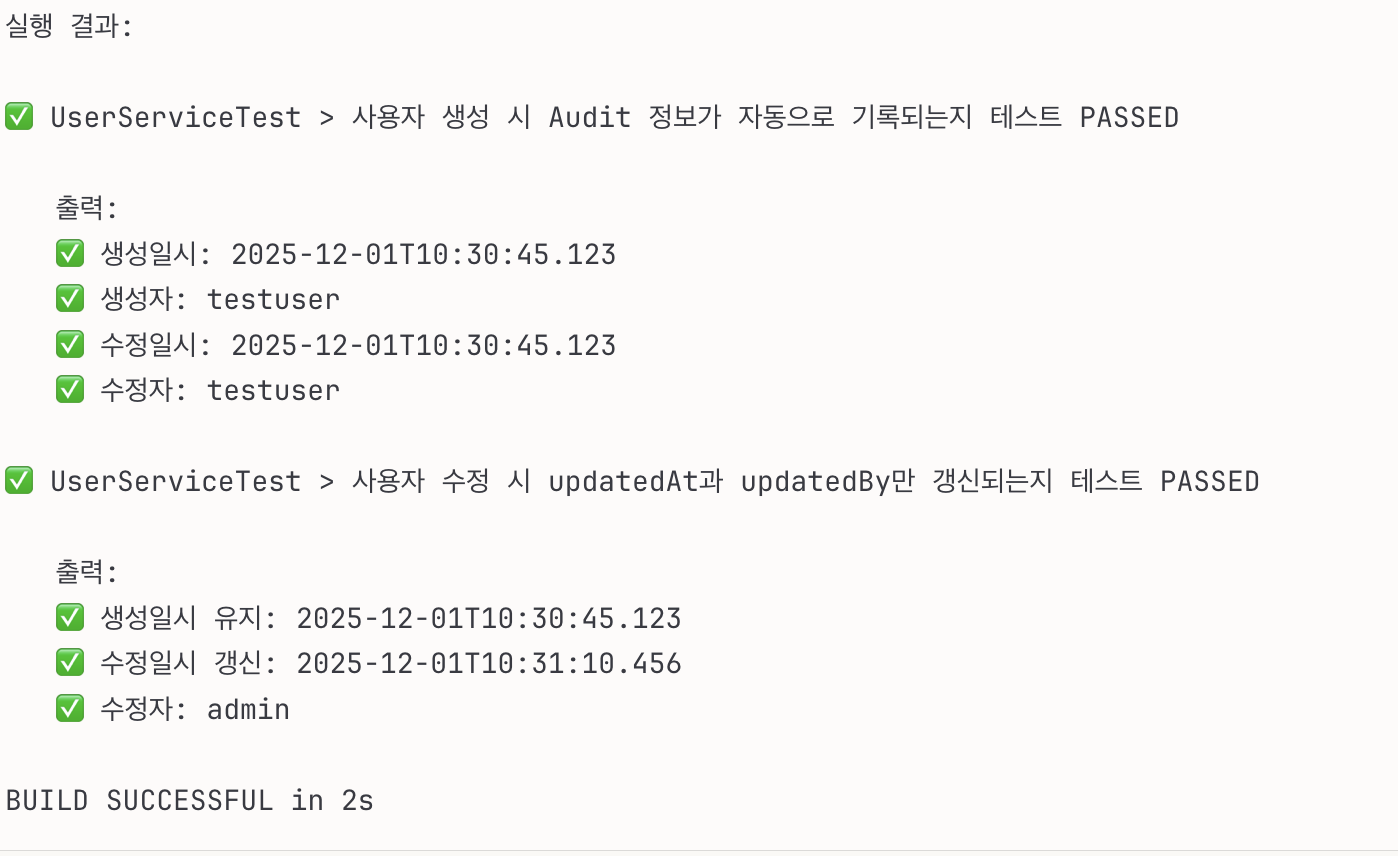
📸 이미지 3: 테스트 실행 결과 스크린샷
4. 트러블슈팅 - 자주 겪는 문제들
❌ 문제 1: createdAt이 null로 저장됨
증상:
val user = userRepository.save(User(name = "김철수", ...))
println(user.createdAt)  // null 출력 😱
원인: @EnableMongoAuditing을 설정하지 않음
해결:
@Configuration
@EnableMongoAuditing  // ✅ 이 어노테이션 추가!
class MongoAuditConfig {
    // ...
}
❌ 문제 2: createdBy가 항상 "system"으로만 저장됨
증상:
// 로그인 사용자가 "admin"인데...
val user = userRepository.save(User(...))
println(user.createdBy)  // "system" 출력 😱
원인: AuditorAware Bean을 등록하지 않았거나, Spring Security 인증 정보를 제대로 가져오지 못함
해결:
@Bean
fun auditorProvider(): AuditorAware<String> {
    return AuditorAware {
        val auth = SecurityContextHolder.getContext().authentication

        // 디버깅용 로그 추가
        println("현재 인증 정보: ${auth?.name}")

        if (auth != null && auth.isAuthenticated && auth.name != "anonymousUser") {
            Optional.of(auth.name)
        } else {
            Optional.of("system")
        }
    }
}
❌ 문제 3: updatedAt이 갱신되지 않음
증상:
val user = userRepository.findById("123").get()
val updated = user.copy(name = "새이름")
userRepository.save(updated)

// updatedAt이 변경 안 됨! 😱
원인: Kotlin data class의 copy()는 새 인스턴스를 생성하는데, Audit 필드가 val로 선언됨
해결:
// ❌ 나쁜 예
abstract class BaseEntity(
    @CreatedDate
    val createdAt: LocalDateTime? = null,  // val로 선언

    @LastModifiedDate
    val updatedAt: LocalDateTime? = null   // val로 선언
)

// ✅ 좋은 예
abstract class BaseEntity(
    @CreatedDate
    var createdAt: LocalDateTime? = null,  // var로 선언!

    @LastModifiedDate
    var updatedAt: LocalDateTime? = null   // var로 선언!
)
❌ 문제 4: @Transactional 없이 save()를 여러 번 호출할 때
증상:
fun complexOperation() {
    val user = userRepository.save(User(...))  // 첫 save

    // 다른 작업...

    val updated = user.copy(name = "수정")
    userRepository.save(updated)  // 두 번째 save

    // updatedBy가 첫 번째 사용자로 남아있음 😱
}
해결:
@Transactional  // ✅ 트랜잭션 추가
fun complexOperation() {
    // ...
}
📸 이미지 4: Before/After 비교

5. 실무 활용 팁
💡 Tip 1: BaseEntity 추상 클래스 활용
// 공통 Audit 필드
abstract class BaseEntity(
    @CreatedDate
    var createdAt: LocalDateTime? = null,

    @LastModifiedDate
    var updatedAt: LocalDateTime? = null,

    @CreatedBy
    var createdBy: String? = null,

    @LastModifiedBy
    var updatedBy: String? = null
)

// 사용
@Document(collection = "users")
data class User(...) : BaseEntity()

@Document(collection = "products")
data class Product(...) : BaseEntity()

@Document(collection = "orders")
data class Order(...) : BaseEntity()
장점:
- 모든 Entity에 일관되게 Audit 필드 적용
- 한 곳만 수정하면 모든 Entity에 반영
- 코드 중복 제거
💡 Tip 2: Spring Security와 연동
@Configuration
@EnableMongoAuditing
class MongoAuditConfig {

    @Bean
    fun auditorProvider(): AuditorAware<String> {
        return AuditorAware {
            val auth = SecurityContextHolder.getContext().authentication

            when {
                // 1. JWT 토큰에서 사용자 정보 추출
                auth?.principal is JwtUser -> {
                    val user = auth.principal as JwtUser
                    Optional.of(user.userId)
                }

                // 2. 일반 인증 정보
                auth != null && auth.isAuthenticated -> {
                    Optional.of(auth.name)
                }

                // 3. 인증 정보 없음 (배치 작업 등)
                else -> Optional.of("system")
            }
        }
    }
}
💡 Tip 3: TimeZone 설정
// application.yml
spring:
  data:
    mongodb:
      uri: mongodb://localhost:27017/mydb
  jackson:
    time-zone: Asia/Seoul  # ✅ TimeZone 설정

// 또는 코드로 설정
@Configuration
class JacksonConfig {

    @Bean
    fun objectMapper(): ObjectMapper {
        return ObjectMapper().apply {
            registerModule(JavaTimeModule())
            setTimeZone(TimeZone.getTimeZone("Asia/Seoul"))
        }
    }
}
💡 Tip 4: Audit 정보로 변경 이력 조회
// Repository
interface UserRepository : MongoRepository<User, String> {

    // 특정 사용자가 생성한 모든 문서 조회
    fun findByCreatedBy(createdBy: String): List<User>

    // 특정 기간에 생성된 문서 조회
    fun findByCreatedAtBetween(start: LocalDateTime, end: LocalDateTime): List<User>

    // 최근 수정된 문서 조회
    fun findTop10ByOrderByUpdatedAtDesc(): List<User>
}

// Service
@Service
class AuditService(
    private val userRepository: UserRepository
) {

    // 특정 사용자의 활동 내역 조회
    fun getUserActivity(userId: String): UserActivityReport {
        val createdDocuments = userRepository.findByCreatedBy(userId)
        val recentUpdates = userRepository.findTop10ByOrderByUpdatedAtDesc()
            .filter { it.updatedBy == userId }

        return UserActivityReport(
            totalCreated = createdDocuments.size,
            recentUpdates = recentUpdates
        )
    }
}
💡 Tip 5: MongoDB Compass에서 Audit 정보 확인
Compass에서 확인할 내용:
{
  "_id": "507f1f77bcf86cd799439011",
  "name": "김철수",
  "email": "kim@example.com",
  "age": 30,
  "isActive": true,
  "createdAt": ISODate("2025-12-01T10:30:00.000Z"),
  "updatedAt": ISODate("2025-12-01T14:20:00.000Z"),
  "createdBy": "admin",
  "updatedBy": "system"
}
6. 정리 및 다음 단계
📝 핵심 요약
// 1. Configuration
@Configuration
@EnableMongoAuditing
class MongoAuditConfig {
    @Bean
    fun auditorProvider(): AuditorAware<String> = ...
}

// 2. BaseEntity
abstract class BaseEntity(
    @CreatedDate var createdAt: LocalDateTime? = null,
    @LastModifiedDate var updatedAt: LocalDateTime? = null,
    @CreatedBy var createdBy: String? = null,
    @LastModifiedBy var updatedBy: String? = null
)

// 3. Entity
@Document(collection = "users")
data class User(...) : BaseEntity()

// 4. 사용
val user = userRepository.save(User(...))
// → Audit 정보 자동 기록!
✅ 체크리스트
MongoDB Audit 제대로 설정했는지 확인:
[ ] @EnableMongoAuditing 어노테이션 추가
[ ] AuditorAware Bean 등록
[ ] BaseEntity 생성 (또는 각 Entity에 Audit 필드)
[ ] Audit 필드를 var로 선언
[ ] 테스트 코드로 검증
[ ] MongoDB에서 실제 데이터 확인
🔗 관련 글
- Spring Data MongoDB 시작하기
- MongoDB Indexing 최적화 가이드
- Spring Security + JWT 인증 구현
❓ 자주 묻는 질문
Q1. JPA Auditing과 차이가 있나요?
개념은 동일하지만, MongoDB는 @EnableMongoAuditing, JPA는 @EnableJpaAuditing을 사용합니다.
Q2. LocalDateTime 대신 Instant를 써도 되나요?
네! Instant, ZonedDateTime, Date 등 다양한 타입을 지원합니다.
Q3. createdBy를 Long 타입(사용자 ID)으로 쓸 수 있나요?
가능합니다! AuditorAware<Long>으로 변경하면 됩니다.
Q4. Audit 필드를 숨기고 싶은데요?
@JsonIgnore 어노테이션을 추가하면 API 응답에서 제외됩니다.
궁금한 점이 있으시면 댓글로 남겨주세요! 💬
'컴퓨터 공학 > DB' 카테고리의 다른 글
| MongoDB에서 Time Series 기능을 사용하지 않고 일반 컬렉션을 활용하는 것과의 차이점 (0) | 2025.01.21 |
|---|---|
| MongoDB Time Series Collection (몽고DB 시계열 컬렉션)란? (1) | 2025.01.21 |
| Time Series DB 란? (0) | 2025.01.20 |
| RDB, NoSQL, CAP, PACELC, ACID, 정규화 (0) | 2020.10.13 |
